

Mix Maestro
An image blending, masking, and double exposure app for Canva
Mix Maestro brings layer-based image compositing to Canva. It lets users combine a base image with a blend layer using sixteen blend modes, carve the result with cut-out operations, shape it with a dedicated mask layer, and create classic double exposure fades. Everything renders live in an interactive preview with direct manipulation handles, and the finished image exports straight to the design at full resolution. All processing happens client side in the browser.
Intro and tutorial video for Spectrum Supreme
Directory
Key Features

1. Layer System
Purpose: Three assignable layer slots with a required base and optional blend and mask layers.
How it Works:
-
The base image defines the frame and output resolution
-
The blend layer sits above the base and receives blend modes and opacity
-
The mask layer never draws as color; it only carves alpha
-
Uploads fill the selected slot first, then base, blend, and mask in order
-
Any layer can be removed and replaced without disturbing the others
User Experience:
-
Compact thumbnail wells with active-state highlighting
-
Tap any well, including empty ones, to target it
-
Swap button exchanges the base and blend images
-
Small cross beside each label removes that layer

2. Interactive Preview
Purpose: A live composite preview with editor-native transform controls.
How it Works:
-
The preview frame matches the base image's aspect ratio
-
Portrait images letterbox inside a square so the preview never dominates the panel
-
All transforms are stored in resolution-independent frame space, so the preview and the export are always identical
User Experience:
-
Drag a layer to move it
-
Corner handles scale, the top handle rotates, with a magnetic snap at 45 degree increments
-
Double click re-centers the active layer
-
Tap a layer in the preview to select it; overlapping layers cycle in stacking order
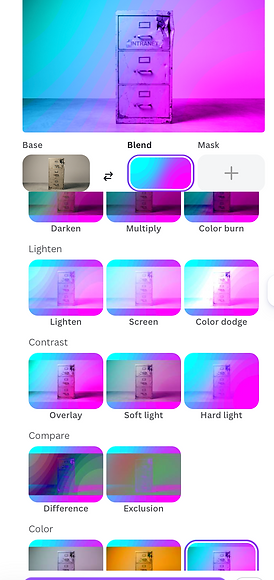
3. Blend Modes
Purpose: Sixteen blend modes rendered as a live thumbnail grid.
Available Modes:
-
Normal
-
Darken group: Darken, Multiply, Color burn
-
Lighten group: Lighten, Screen, Color dodge
-
Contrast group: Overlay, Soft light, Hard light
-
Compare group: Difference, Exclusion
-
Color group: Hue, Saturation, Color, Luminosity
User Experience:
-
Every mode shows a live thumbnail of the actual images, not an abstract icon
-
Thumbnails include the current mask and cut-out state, so what you see is the true result of picking that mode
-
A single opacity slider controls the blend layer's strength

4. Cut Out Operations
Purpose: Boolean operations between the base and blend layers.
Available Operations:
-
Show both: no cutting, both layers visible
-
Overlap only: keeps the result where both images overlap
-
Base minus blend: the blend image cuts a hole in the base
-
Blend minus base: keeps the blend only where it hangs outside the base
Cut Using:
-
Transparency: uses each image's alpha channel
-
Brightness: builds a luma matte so cut-outs work with any photo, with a flip switch to choose whether lights or darks survive
-
A hint appears if transparency cutting is selected when neither image has transparent areas

5. Mask Layer
Purpose: A dedicated third image whose only job is to shape the result.
How it Works:
-
Matte by transparency or brightness, with invert
-
Applies to the blend layer, the base layer, or everything
-
Bright areas keep the result and dark areas remove it
-
The mask has its own full move, scale, and rotate transform, so it can be positioned independently of the images it carves
User Experience:
-
Works standalone as an image plus mask workflow with no blend layer loaded
-
The matte tracks the mask layer's transform live in the preview

6. Double Exposure
Purpose: The classic two-image fade, built on a gradient mask over the blend layer.
Controls:
-
Linear or radial fade shape
-
Direction, position, and softness sliders
-
Flip switch to reverse which end is opaque
-
Three one-tap styles: Classic, Silhouette, and Fade

7. Finetune
Purpose: Numeric precision for every transform.
Controls:
-
Segmented selector for position, scale, and rotation
-
Horizontal and vertical sliders, scale percentage, and rotation angle
-
Reset layer button returns the active layer to its default transform
8. Export Functions
Add to Design:
-
Places the finished composite directly on the current design
-
Exports at the base image's natural resolution, capped at 4096 pixels on the longest edge
Save to Uploads:
-
Saves the composite to the Canva media library for reuse
Format Handling:
-
Fully opaque results export as JPEG for fast uploads
-
Results with transparency export as PNG to preserve the alpha channel
Frontend Interface
-
React-based user interface built with Canva's App UI Kit
-
Sticky preview workbench with collapsible accordion sections
-
Responsive design optimized for Canva's 350px width constraint
Composite Engine
-
Canvas-based rendering pipeline with per-layer transforms
-
Rec.601 luminance mattes for brightness-based masking and cutting
-
Resolution-independent frame-space model: preview and export share one code path
Integration Layer
-
Canva Design SDK for element placement
-
Asset upload system for saving to the media library
-
Selection API for importing images directly from the design
Core Components
Canva Platform
-
App UI Kit: native Canva components for a consistent experience
-
Design SDK: direct integration with Canva's design system
-
Permissions: content read and asset upload permissions
-
Performance: optimized for Canva's sandbox environment
Browser Compatibility
-
Modern browsers: latest Chrome works best
-
Client side processing: no images leave the browser
-
Touch support: pointer-event based controls
Technical Integration
Design Guidelines
-
Start with the styles: the Classic, Silhouette, and Fade presets are fast routes to a strong double exposure
-
Screen and Lighten suit bright textures over dark subjects; Multiply suits dark textures over bright subjects
-
Use Brightness cutting for photographs, and Transparency cutting when working with PNG graphics
-
Position the mask layer independently: rotating or scaling a mask often improves a composition more than changing the images
Performance Tips
-
Very large images are automatically capped at 4096 pixels on export
-
The blend thumbnail grid refreshes after you stop adjusting, so brief pauses keep everything smooth
-
Reset a layer with a double click if a transform gets away from you
Best Practices
Common Issues
-
Base image seems to vanish: the blend layer is covering it at full opacity in Normal mode; pick a blend mode or lower the opacity
-
Cut out does nothing: both images are fully opaque; switch Cut using to Brightness
-
Mask has no visible effect: check the Applies to setting matches the layer you expect it to carve
Troubleshooting and Support
Current Version: 1.3.0
-
Per-layer delete controls with slot-preserving replacement flow
-
Base loads first; uploads target the selected slot
-
Dedicated mask layer with transparency and brightness mattes and selectable target
-
Cut out renamed from Mask with brightness-based cutting for photos
-
Grouped blend mode grid with live thumbnails
-
Double exposure styles, gradient fade controls, and export improvements